
IndSoft Systems a leading provider of Cloud Computing & Dedicated Server offers a range of solutions which is specifically designed for hosting high-performance WordPress, Java, and blockchain-based environments. In other words, IndSoft Systems offer all the flexibility to manually configure and maintain virtualized high-performance servers SSD based servers.
Synopsis of Current Article
- Select Cloud Config on https://www.indsoft.net
- Login Server using SSH
- Select expected version using nvm install VERSION_NUMBER OR
- Use Stable Latest LTS Version
- Start your application using npm start
- Pre-Configured Proxy Nginx Server will route your default 3000 PORT to 80 Port.
- Add A Record for your Website open your site on Domain name.
- A server configured with Firewall Setup
The above will be a simple step to start the NodeJS application quickly in IndSoft Cloud.
Setup your IndSoft Systems Cloud
Register on https://indsoft.net If do not have an account, you can register using this link
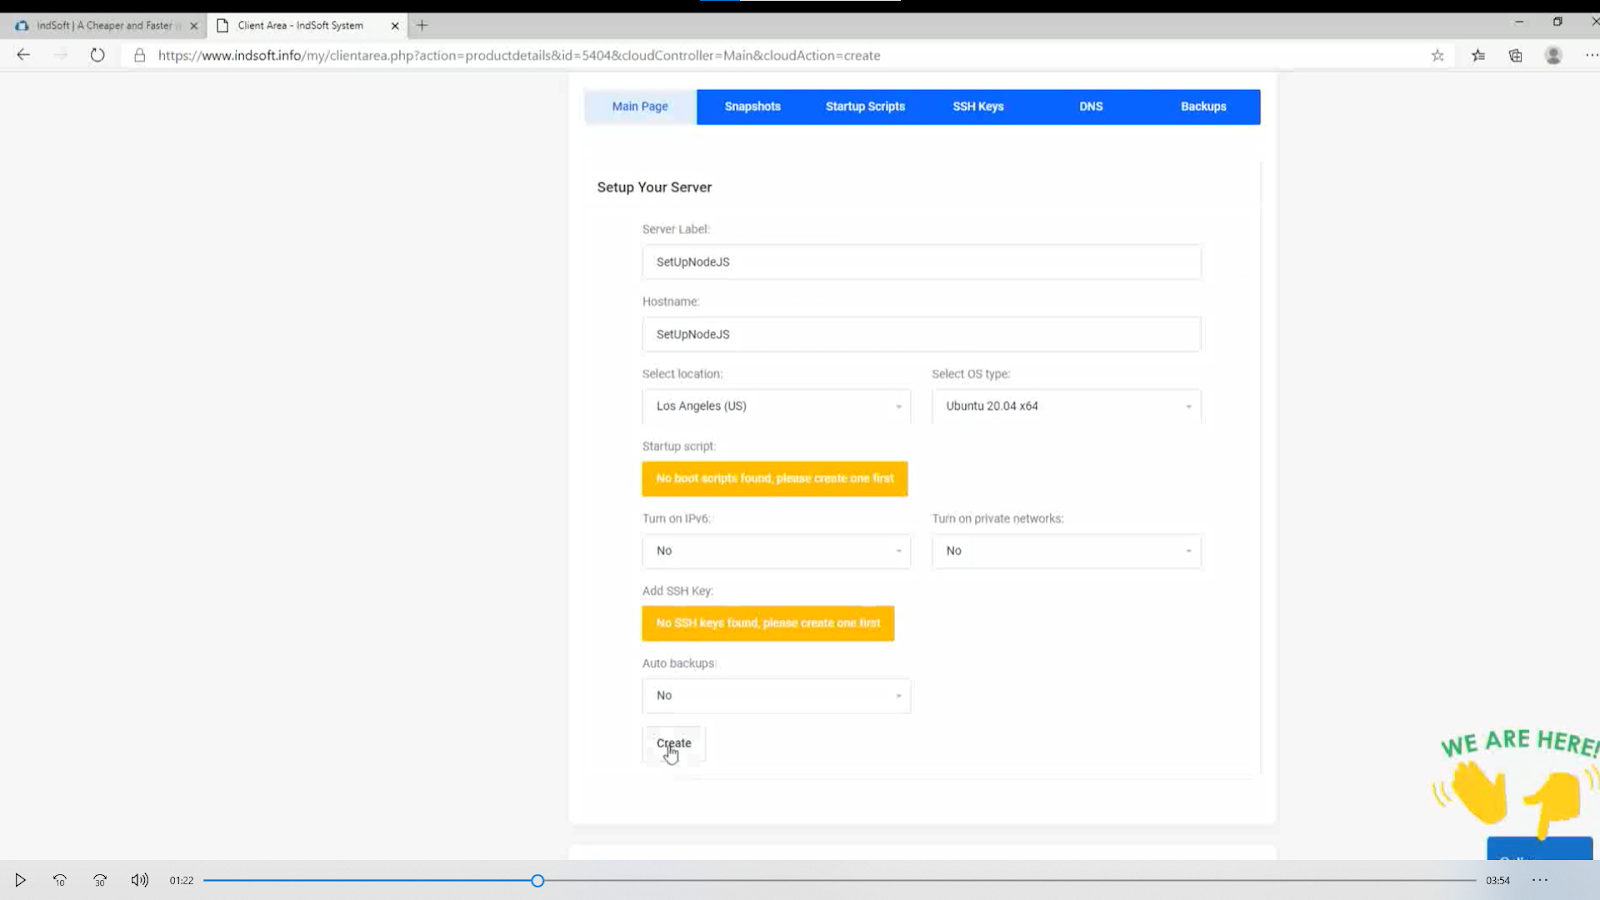
Step 1 — Select the cloud specs as per your requirement to run the application. \
Step 2 – Choose an Image and a plan.

Step 3 — Choose a Datacenter Region, Where the cloud needs to be colocated

Step 4 — Choose a hostname for your Cloud (Default Name: Indsoft-Nodejs)
We will let the rest of the configurations stay as default. Now scroll down and choose to Create Cloud
Connect to your Cloud
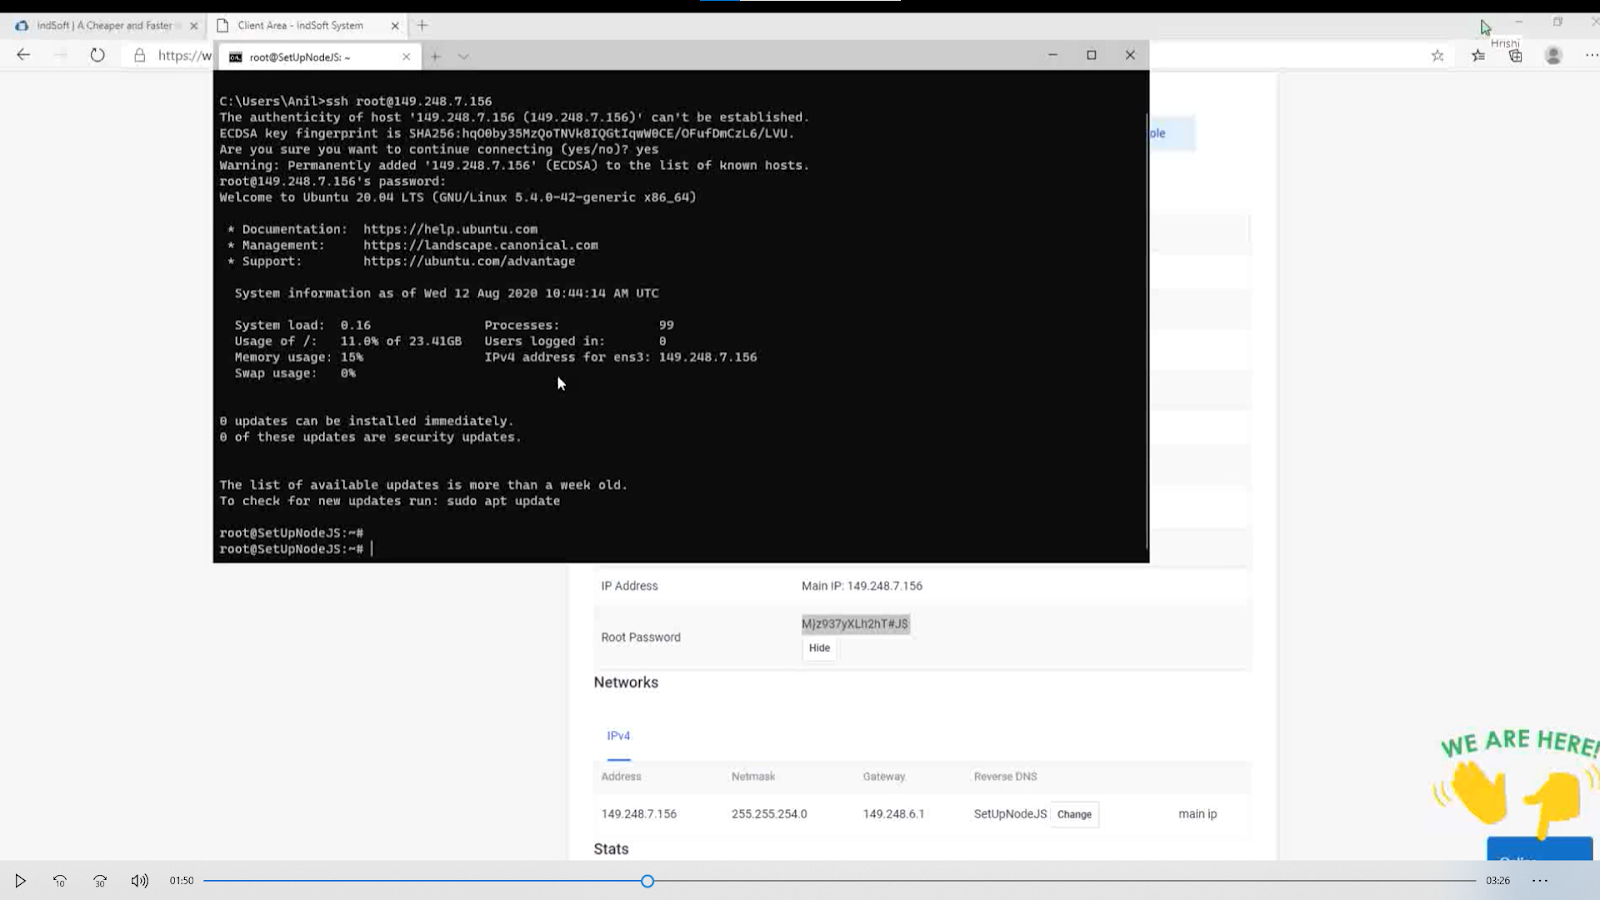
Copy the public IP of your cloud in the Resources section of your project.
Now run the following command in your terminal to connect to your cloud,
ssh root@yourpublicipaddress
Pass :- NodeJS@indsoft
Congratulations, You have now successfully SSH ed into your Ubuntu
Setup NodeJS
Run the following commands in your server’s terminal to setup NVM & NodeJS,
– Install Node Version Manager
curl -o- https://raw.githubusercontent.com/nvm-sh/nvm/v0.35.3/install.sh | bash
Install NodeJS
nvm install 12.18.3 (Current version :- 12.18.3)
nvm use 12.18.3
node –version

Setup your Project
Run the following commands in your server’s terminal,
sudo mkdir app
cd app
sudo git clone https://github.com/IndSoftNet/SimpleNodeJS
Note that this is the Github Repository URL of our sample NodeJS App. If you are deploying your own application, you will use your own Repository URL when you use the clone command.
Now we will install our project dependencies using the following commands,
cd SimpleNodeJS
npm install
Setup PM2
Note that we will not use the npm start command to run our application. Instead, we use PM2 that will allow our application to run in the background.
Run the following in your server’s terminal to install PM2 globally,
npm install pm2 -g

To run your application with PM2, run the following command while in your project directory,
pm2 start server.js
Note that server.js is the name of our application’s endpoint. If your project has a different endpoint, make sure you replace server.js in the above command with the name of your endpoint.
To make sure that PM2 restarts when our cloud reboots, run the following command in your server’s terminal,
pm2 startup
Setup Firewall
Run the following to enable the firewall,
sudo ufw enable
However, you will need to configure the firewall to allow HTTP, HTTPS and SSH access. Run the following commands in your server’s terminal,
sudo ufw allow http
sudo ufw allow https
sudo ufw allow ssh

Setup NGINX
Now we need to install NGINX to configure a reverse proxy for our application.
Run the following in your server’s terminal,
sudo apt install nginx

Link your project with NGINX
Run the following command in your server’s terminal to open the default file using Vim,
sudo vim /etc/nginx/sites-available/default
If you have not used Vim before, check this guide on basic vim commands.
Inside the location block, which is nested inside the server block, remove the following line of code,
try_files $uri $uri/ = 404;
Also, add the following lines of code inside the location block (Editing the placeholder text with your App Port Number off-course),
proxy_pass http://localhost:{{YOUR-APP-PORT-IN-YOUR-CODE}};
proxy_http_version 1.1;
proxy_set_header Upgrade $http_upgrade;
proxy_set_header Connection ‘upgrade’;
proxy_set_header Host $host;
proxy_cache_bypass $http_upgrade;

Also, if you want to successfully configure an SSL Certificate for your application (which we will in a moment) and add a custom domain, don’t forget to add the following line of code inside the server block and before the location block. We will use the custom domain abdullahsumsum.com for the sake of this article.
server_name indsoftsumsum.com www.indsoftsumsum.com;
Make sure you save the file by pressing the esc key, then typing :wq and then pressing the return key to save and close the vim editor.
The following is what our server block in our default file should look like after making the above changes,

Run NGINX
Run the following commands in your server’s terminal,
sudo nginx -t
sudo service nginx restart

You should now be able to visit your application by typing your public IP on the browser!
Your NodeJS Project has now been successfully deployed! You should be able to access your Web Application through a secure SSL connection!
ScreenShots

